
Creating a basketball simulator using UIKit only
There are a lot of useful built-in tools in UIKit. Believe it or not, there is a whole physics engine integrated into the framework. It is called UIKit Dynamics, and it allows you to add different behaviors(for example, elasticity) to your views.
Today, we are going to make a simple basketball simulator, using only UIKit. Let’s get started!

an image from my iosdev.kz Instagram account
Creating a ball
We will begin by creating a simple UIImageView object in viewDidLoad():
var ball = UIImageView()
ball.translatesAutoresizingMaskIntoConstraints = false
ball.image = UIImage(named: "ball")
ball.clipsToBounds = true
ball.layer.cornerRadius = 50
Since handling UIKit dynamics and Auto Layout is a bit tricky, we are setting the frame manually:
ball.frame = CGRect(x: view.center.x - 50, y: 250, width: 100, height: 100)
Now when it is done, we can focus on more important things.
Animator and behaviors
Moving forward, it is good to become acquainted with some theory first. There are only two main classes in UIKit Dynamics:
- UIDynamicAnimator —is the main object responsible for all the behaviors of the views.
-
UIDynamicBehavior — is the superclass of every UIKit view behavior.
When we initialize UIDynamicAnimator we set its reference view, i.e the view in the bounds of which it operates. We specify which views have certain behavior when we instantiate UIDynamicBehavior. To make created behaviors occur, we add them to the corresponding UIDynamicAnimator object.
Adding gravity
It’s time to try what we learned in practice. Adding gravity is super-easy:
// UIDynamicAnimator is the main object responsible for all the dynamic behaviors.
let animator = UIDynamicAnimator(referenceView: self.view)
let gravity = UIGravityBehavior(items: [ball])
animator.addBehavior(gravity)
Create collisions
If you test the code above you will see that the ball falls off the view’s frame. How do we fix it? The answer is simple: we need to set the view’s frame as boundaries for the ball. We do it by creating a UICollisionBehavior instance:
let collision = UICollisionBehavior(items: [ball])
collision.translatesReferenceBoundsIntoBoundary = true
// making the ball bounce of the view's frames
collision.collisionDelegate = self
// setting the collisionDelegate is optional
animator.addBehavior(collision)items: [ball])
animator.addBehavior(gravity)
We set our PhysicsViewController as the delegate of the collision so we can call UICollisionBehaviorDelegate methods later on.
Make it elastic
Good, now the ball stays in the frame. But it doesn’t bounce off as a real ball would. Let’s make the view elastic:
let behavior = UIDynamicItemBehavior(items: [ball])
behavior.elasticity = 0.9
animator.addBehavior(behavior)
Shaping the ball
I will tell you a little secret: at this point, our ball is actually not round, but square. You can verify this by changing its angle: the ball will bounce off from the transparent corners.
ball.transform = CGAffineTransform(rotationAngle: CGFloat.pi / 4)
Unfortunately, we can’t just change the view’s corner radius and expect the view to act differently.
We have to create a custom UIImageView subclass with minor changes:
class CircleView: UIImageView {
  // setting collision’s bounds type to an ellipse.
  override var collisionBoundsType:
           UIDynamicItemCollisionBoundsType { return .ellipse }
  override func layoutSubviews() {
    super.layoutSubviews()
    //  Creating a custom CAShapeLayer object which makes the view's shape round
    let shapeLayer = CAShapeLayer()
    shapeLayer.fillColor = UIColor.clear.cgColor
    let center = CGPoint(x: bounds.midX, y: bounds.midY)
    shapeLayer.path = circularPath(center: center).cgPath
    layer.addSublayer(shapeLayer)
  }
  private func circularPath(center: CGPoint = .zero) -> UIBezierPath
  {
    // this UIBezierPath corresponds to a shape of a circle
    let radius = min(bounds.width, bounds.height) / 2
    return UIBezierPath(arcCenter: center,
                        radius: radius,
                        startAngle: 0,
                        endAngle: .pi * 2, clockwise: true)
  }
}
Even though the amount of this code is a little bigger than the previous ones, it’s pretty straightforward, and I hope the comments I left there will help you understand it.
Great! Now the ball is fully ready ;)
Creating a basketball hoop
Finally, it’s time to create a basketball hoop. Let’s go! Because we are making a 2d-version of basketball, our hoop will be made of these parts(view image):
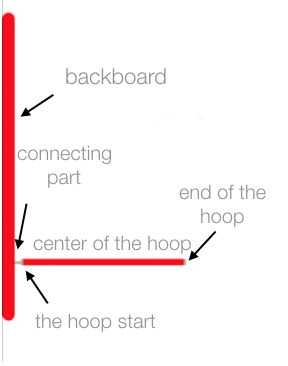
The parts of the hoop will be just separate views:
var backboard = UIView()
backboard.backgroundColor = .red
backboard.translatesAutoresizingMaskIntoConstraints = false
// the same for connectingPart, hoopBeginning, hoopEnd and hoopCenter(except 'hoopCenter.layer.zPosition = 1')
Framing the parts(again, manually in order to save time):
backboard.frame = CGRect(x: 0, y: 100, width: 10, height: 250)
connectingPart.frame = CGRect(x: 10, y: 302, width: 5, height: 2)
hoopBeginning.frame = CGRect(x: 15, y: 300, width: 2, height: 5)
hoopCenter.frame = CGRect(x: 17, y: 300, width: 130, height: 5)
hoopEnd.frame = CGRect(x: 147, y: 300, width: 2, height: 5)
Now, we need to add to a previously created collision new boundaries — i.e the basketball hoop parts.
collision.addBoundary(withIdentifier: "back" as NSCopying, for: UIBezierPath(rect: backboard.frame))
collision.addBoundary(withIdentifier: "connecting" as NSCopying, for: UIBezierPath(rect: connectingPart.frame))
collision.addBoundary(withIdentifier: "start" as NSCopying, for: UIBezierPath(rect: hoopBeginning.frame))
collision.addBoundary(withIdentifier: "end" as NSCopying, for: UIBezierPath(rect: hoopEnd.frame))
We also should not make parts of the basketball hoop items of the collision — it would result in them moving and going off the intended places, and we want them to act only as boundaries.
As you may notice, we also create identifiers for every boundary. They are needed to distinguish between different views which were contacted by items. It is helpful in UICollisionBehaviorDelegate methods:
func collisionBehavior(_ behavior: UICollisionBehavior,
beganContactFor item: UIDynamicItem,
withBoundaryIdentifier identifier: NSCopying?, at p: CGPoint) {
guard let id = identifier as? String else { return }
  // In this case, we just print out every interaction the ball is creating.
  print("Contact occurred - \(id)")
}
Attachment
The last step is to give the user the ability to control the ball. Hopefully, UIKit Dynamics has just right what we need — attachment behavior.
override func touchesBegan(_ touches: Set<UITouch>, with event: UIEvent?) {
  if let theTouch = touches.first {
    currentLocation = theTouch.location(in: self.view)
    // offset makes the attraction more realistic
    let offset = UIOffset(horizontal: 20, vertical: 20)
    // assigning the attachment point of the ball to the touch location, which makes it hang at a certain distance
    attachment = UIAttachmentBehavior(item: ball,
                                      offsetFromCenter: offset,
                              attachedToAnchor: currentLocation)
    // The frequency of oscillation for the attachment behavior.
    attachment.frequency = 1.5
    animator.addBehavior(attachment)
  }
}
In this piece of code, we created an attachment point where user touch has occurred on the screen.
We also should implement touchesMoved and touchesEnded methods in order to handle the attachment functionality properly:
override func touchesMoved(_ touches: Set<UITouch>, with event: UIEvent?) {
  if let theTouch = touches.first {
    // Making sure to change the attachment location along with the user’s touch
    currentLocation = theTouch.location(in: self.view)
    attachment.anchorPoint = currentLocation
  }
}
override func touchesEnded(_ touches: Set<UITouch>, with event: UIEvent?) {
  // Removing behavior when the user touch has ended
  animator.removeBehavior(attachment)
}
Final result:
Here is the how the app should look like:
Make sure to check out the source code and experiment with the project on your own!
Until next time!
I hope this article was helpful to you! Share with this post and follow me on Instagram where I post the short versions of my iOS development articles. You can also visit my Medium account.
P.S: any support is highly appreciated ;)
Thanks for reading!